Monday 9 November 2015

Photographing the Wildlife of Borneo


The Natural History of Sabah,  Borneo

When I was around 9 or 10 I was given an encyclopaedia of nature for Christmas. It contained a photograph of a Malaysian man, wearing a traditional hat, sitting next to an enormous orange plant – the largest flower in the world. Ever since, I have wanted to visit Borneo where the photo was taken, and finally got the chance a few weeks ago.

 We started our trip at Mount Kinabalu, where only a few weeks before our visit a  major earthquake  occurred. The locals still maintain this was caused by stupid, childish  foreign students who danced naked on the summit after climbing the mountain (even after the guides had asked them not to!) – it is very sacred to the Bornean people.

One of our  main aims was to see carnivorous pitcher plants in the wild, on the slope up the mountain. Unfortunately the path up was shut due to the earthquake, so we were taken to an alternative site near Kinabalu golf club, apparently the highest in the world. After a very strenuous climb (involving machetes)  through dense jungle (when several members of the party turned back) we arrived at the spot, and were shown Nepenthes rajah, the largest of the pitcher plants. It was extraordinary to see them growing in the wild, and a real privilege. Just as we finished photographing them it started to rain, and when it rains in Borneo, it rains!! Our journey down became hazardous with mud which turned into a highly slippery surface – I fell a couple of times and got caked in thick, orange mud.

This pitcher plant (Nepenthes rajah) was well worth the strenuous climb. Half filled with fluid they are quite heavy to hold.
Another key species for me was to see Rafflesia, the flower from the picture in the encyclopaedia. This is a very hit and miss affair, and you are by no means guaranteed to see one, but we were lucky to be shown a pristine specimen, three days old. It wasn’t the largest (they grow on Sumatra) but still a very impressive sight. Apparently only 10% of the flower buds actually flower, taking around 18 moths to do so!

Rafflesia keithii. A pristine flower, three days old, approximately 50cm across.


 After that the trip involved  travelling further and further into  the rainforest, staying at a succession of lodges, finishing with 6 days at the superb Danum Valley. We did several boat trips on the Kinabatangan river, where we got great views of the wonderful Proboscis Monkeys, as well as brilliant views of the Bornean Pygmy Elephant, both by day and by night.
Bornean Pygmy Elephant
 
 
Proboscis Monkey


We saw plenty of wild Orangs (much better than the rather disappointing Sepilok Centre) as well as other monkeys including Silvered Leaf and Red Leaf Monkeys.
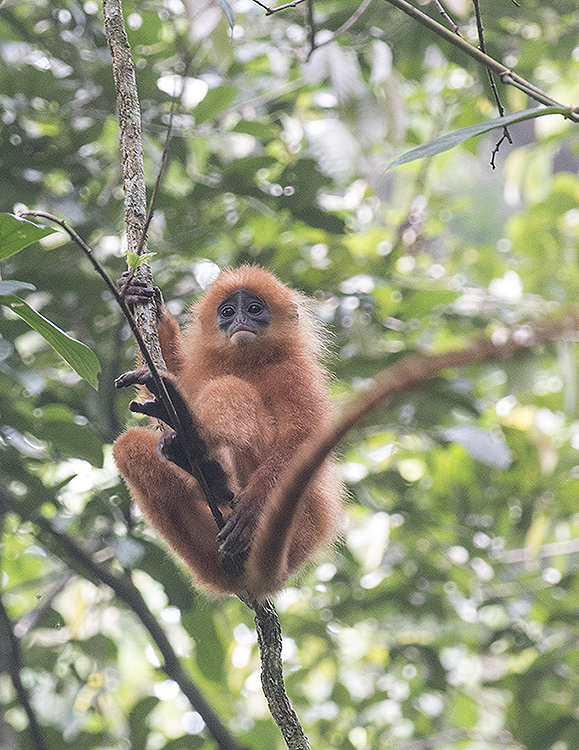
 Female Orang-utan with youngster
Red Leaf Monkey
 

The rainforest was drier than expected (it is an El Nino year) but we still saw a great array of frogs, snakes lizards and insects, my own favourite being the huge Three Horned Rhinoceros Beetle.
Three Horned Rhinoceros Beetle


Throughout the trip we used a variety of photographic techniques, including long lens work from boats, long exposures of fireflies at night, ultraviolet images of scorpions, time lapse cloud scenes and high speed photography of seeds spiralling down from trees.
Fireflies at night. A 30 second exposure from the bank of the river, from a wooden platform provided by the guides from the lodge.
 
 
Large scorpion fluorescing in ultraviolet light at night in the Danum Valley
 
A tiny bat, roosting in a rolled up banana leaf. It became an obsession to check every leaf for bats!
Dipterocarp seeds spiralling down from tree


Seed of Alsomitra, one of the largest winged seeds in the wold, spiralling down from the canopy

A Dead Leaf Mantis - showing extraordinary camouflage

A Bornean Horned Frog

Oriental Dwarf Kingfisher

Lantern Bug

Mossy Tree  Frog
 
 Long Crested Forest Dragon
 
Short Crested Forest Dragon
 
Wagler's Pit Viper - a beautiful snake, which we saw on several occasions

Gomantong Cave, a major source of nest of Cave Swiftlets used in Birds Nest Soup. A hopefully subtle HDR image, composed of three separate images.

 
 Sunrise in the Danum Valley.

My trip was organised by Wildlife Worldwide, and led by the brilliant Nick Garbutt, whose knowledge of the natural history of Borneo is second to none, and whose animal wrangling skills led to some great images (though don’t mention Atlas Moths !). For more details other trips organised by Wildlife Worldwide and Nick, see: http://www.wildlifeworldwide.com/discover/holiday-types/photography-tours-nick-garbutt


All in all a brilliant trip, and I can’t wait to return!

Tuesday 20 January 2015

Tropical Butterflies in mid Winter!


It’s that time of year when hundreds of people flock to the glasshouse at the RHS garden at Wisley, Surrey,  to see the tropical butterflies on display there. Many photographic “purists” may balk at the idea of photographing captive, bred specimens, but I think this is a wonderful opportunity both to see some spectacular insects close-up, and to try out new kit and techniques. I’m off to the jungles of Borneo later this year, and hope to see some of the butterflies there, but doubt that I will get as good an opportunity to photograph them in such detail.
Wherever possible I always use a tripod or monopod, though this will not be possible when members of the public are present in most places. If in doubt. ask one of the attendants.
 
This Tree Nymph (Idea leuconoe) is perched on a cultivated variety of  Anthurium, but I think still makes an interesting image.

Of course, the images you obtain will not be natural, and it is highly possible that you will get south American butterflies perched on Asian plants for example, but it is really the only way of photographing these species without travelling to exotic locations.  I also use it as an opportunity to try out new camera angles and composition. It can be very boring seeing a series of butterfly shots where the wings are all parallel to the camera, and square in the frame. Try tilting the camera, or photographing the butterfly head on. Again, this would not be easy in the wild.
 
This Mexican Bluewing (Myscelia ethusa)  stayed  still for long enough for me to try out a few compositions before it flew off. The foliage is neutral enough to be plausible.

Behaviour

Photographing in controlled conditions can give unique opportunities to photograph butterfly behaviour. Mating, laying eggs and emergence from pupae are worth looking for as the subjects will generally stay in the same place for a good length of time.  Many butterfly houses have emergence areas where pupae are hung on sticks, where you can watch and photograph butterflies emerging from their pupae.
 
When laying eggs, insects will often stay in the same place. This Malay Lacewing  (Cethosia hypsea)  took more than an hour to lay this batch of eggs. I used a small piece of silvered card to throw some light underneath it.

There will also be good opportunities for shooting close-ups of eyes and other details.


 Butterfly houses are a great place to try out macro techniques. This a species of Charaxes.

Condensation

The question I am asked most is how to prevent condensation forming, when taking a cold camera into a hot glasshouse. The trick is to warm the camera first. I used to put a hot water bottle in my camera bag, but now pack two or three re-usable handwarmers around the camera to keep it warm whilst I travel to the garden.
 
 
The larva of the Owl butterfly (Caligo memnon) feeds on banana trees and grow to a large size.
 

Lenses

A well designed butterfly house will have a number of paths through vegetation, so the subjects should never be too far away, but even so, a relatively long focal length macro lens will be useful. I frequently use my 105mm macro lens with 1.4 or 1.7X tele-converters, or a 70 – 200mm lens, sometimes with a small extension tube. A 200mm length macro lens would be good.


Light

I always prefer to use natural light whenever possible. The light in glasshouses is often soft and diffuse, particularly if the glasshouse roof is whitewashed, or has blinds to diffuse the light. On sunny days though, the light will be harsh and contrasty. Small reflectors or diffusers can be useful; though do require a very co-operative subject! All of the images shown here was shot with natural light.
 
Generally I try to avoid bright areas in the background, but this image shows that it is always   worth trying new angles and ideas. The backlighting on this Malachite butterfly (Siproeta stelenes) is particularly effective.

If you haven’t done so already, do make a trip to Wisley in the next few weeks. The butterflies are there until the 8th March. I doubt that you will be disappointed!


Monday 12 January 2015

Manipulation or Illustration?


Although I have been a Photoshop user since version 1.5, and have taught it to hundreds of students and clients over the years, I have never really wanted to use any of the “creative” features to modify my images. My main aim with my own photography is to “get the image in the camera” if I possibly can. I use Photoshop primarily to enhance my pages before publication, and for cataloguing my images. Without wishing to re-open the debate about digital manipulation of natural history photographs, I would be really interested to hear from readers what they think of the examples shown.

Over the last couple of years I have attempted to photograph several naturally occurring events which I have found practically  impossible, and where I have used Photoshop to help “create” the image that I visualised. Whenever the images are submitted for publication, I always make it very clear to the client that the images are digital composites

Take the idea of a Sycamore seed spiralling down from a tree. I wanted to show the spiralling pattern, as well as catching the seed in mid-flight. After a few experiments I realised this was an impossible task to do in one exposure. I therefore shot three images in the studio, one of the leaves, one of the spiral (an exposure of ½ second) and a single seed in mid flight (isolated from a stroboscopic sequence shot with my Nikon SB900 flash on its “repeating flash” mode). The three images were then combined in Photoshop using the layers facility.


The second example is a much simpler technique, but does help to visualise an event I was only able to perceive when viewing several images in quick succession.

I was in my garden early one morning, and found this pair of slugs mating. Slugs are hermaphrodite, having both female and male reproductive organs.  Once they have located a mate, they encircle each other and sperm is exchanged through their protruded genitalia. I rushed to get my camera, and photographed them over a period of 10 minutes or so before they separated and went their own ways. When I reviewed the images rapidly  in Adobe Bridge, I found that, over a period of time the slugs moved around in  a circle. To help visualise this I selected the slugs with the Quick Selection tool in Photoshop. I then applied a radial blur filter (it took a few attempts to get the right amount).


If I find another mating pair in the future I will try a long exposure.

 
The third example is different again. I have long wanted to photograph the seed pod of Himalayan Balsam at the point of it bursting. I brought some into my studio, and tried all manner of ways to induce the bursting, but the only reliable way was to squeeze them with a pair of tweezers. I shot two images, one of the seed pods, and another of the seed pod exploding as I squeezed it with the tweezers. I isolated the bursting pod (with the tweezers) and copied and pasted it into the first image, then had to methodically retouch out the tweezers. This took a couple of hours!


What do you think – does the end justify the means??